Getting Started
Welcome to VST Live. Let’s get started!
Overview 🔗
VST Live provides flexible tools to power your performance. At the top level is the Project file, which contains the data you create in VST Live to perform a Setlist. Like its real-word counterpart, a digital Setlist is a list of Songs you intend to perform.
Parts 🔗
Parts are the primary elements for your performances in VST Live. They have two possible scopes:
Global: Available in any Song of the current Setlist.
Song: Songs are composed of Parts.
Each Part can contain Layers, Stacks andModules.
Song Components 🔗
Songs 🔗
Songs can be configured with dedicated components optimized for live performance.
Parts 🔗
Parts are the building blocks of Songs. They can be structured traditionally as arrangement (“Verse”, ”Chorus”, “Outro”) or however you wish. Each Part is unique to the Song it was created for.
Layers 🔗
Layers are virtual MIDI devices. Each Layer can be configured as either a VST Instrument, a VST plugin with MIDI input, a MIDI effect, or a routing from MIDI input to output. A Layer processes either an internal MIDI track or a live MIDI input.
Song Layers belong to a Song; Global Layers belong to a Setlist.
Stacks 🔗
Stacks are the audio equivalent of Layers. Each Stack contains up to four VST plugins, along with two FX sends. The audio for Stacks originates from live inputs, such as vocal microphones or guitars. Each Stack is contained within a Part.
🔗 Lyrics
The lyrics for each Song can be synched with precision to your Song’s Transport to cue you in real-time.
Notes 🔗
Use as scratchpad to plan each Song. Or employ them as reminders for you, your bandmates or your crew.
Track 🔗
A powerful DAW is built into the heart of VST Live. Unlike a recording DAW, VST Live’s DAW is designed solely for live performance.
There are nine types of tracks, inspired by their Cubase counterparts; one is exclusively for live performance:
- Audio
- Chords
- DMX
- Lyric
- MIDI
- Sampler
- Tempo
- Time Signature
- Video
Metronome 🔗
A guide to each bar’s tempo in the correct signature—visually and as a click track.
Modules 🔗
Plugins that add new features, including from third-parties. Modules are contained inside of Parts.
Beats 🔗
A step-sequenced drum machine embedded in each Song.
🔗 Audience
Visualizations of real-time VST Live data for both you (the performer) and the audience
DMX 🔗
Program and control lighting devices using the DMX protocol for each Song.
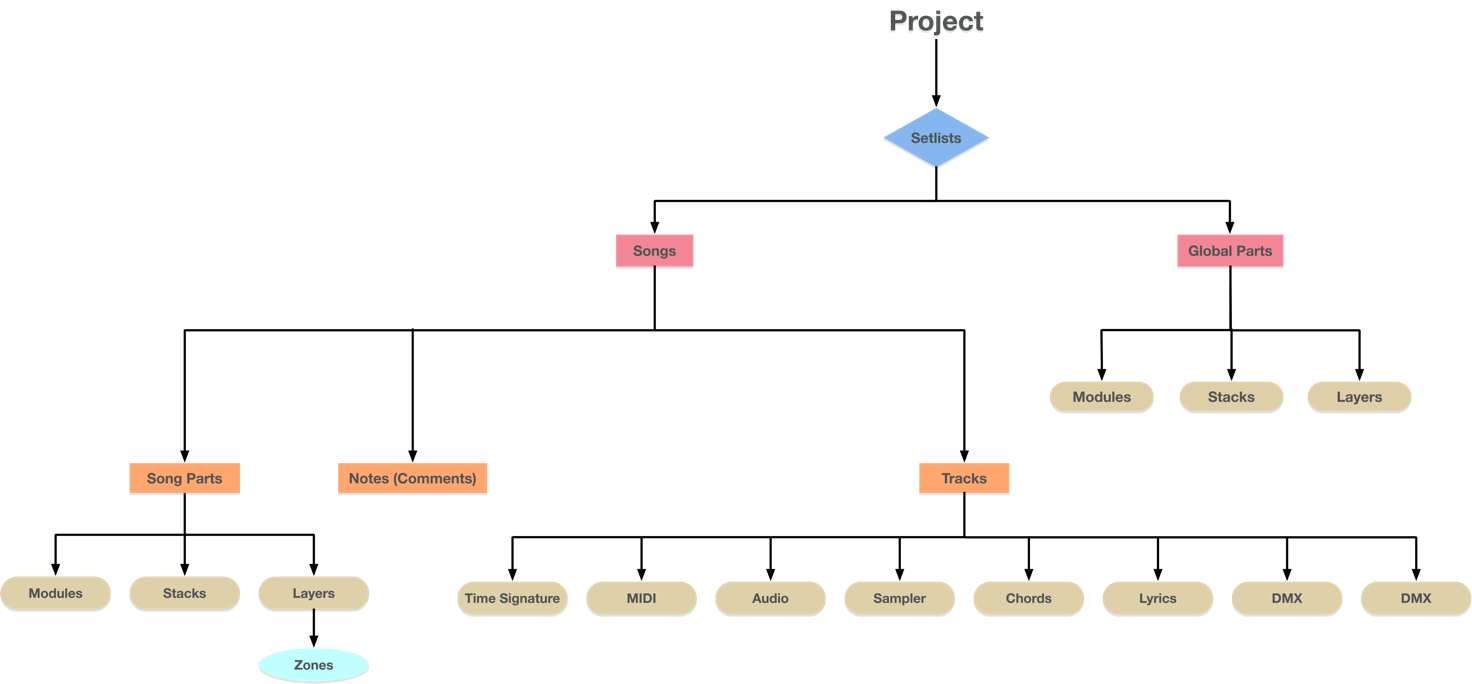
Hierarchy 🔗
The internal hierarchy of a VST Live Project provides a logical delineation of performance data and musical content.
Interface 🔗
Each VST Live Project has one Project Window. It displayed when you open or create a new Project.
When the Hub is open, the Project Window is not visible.
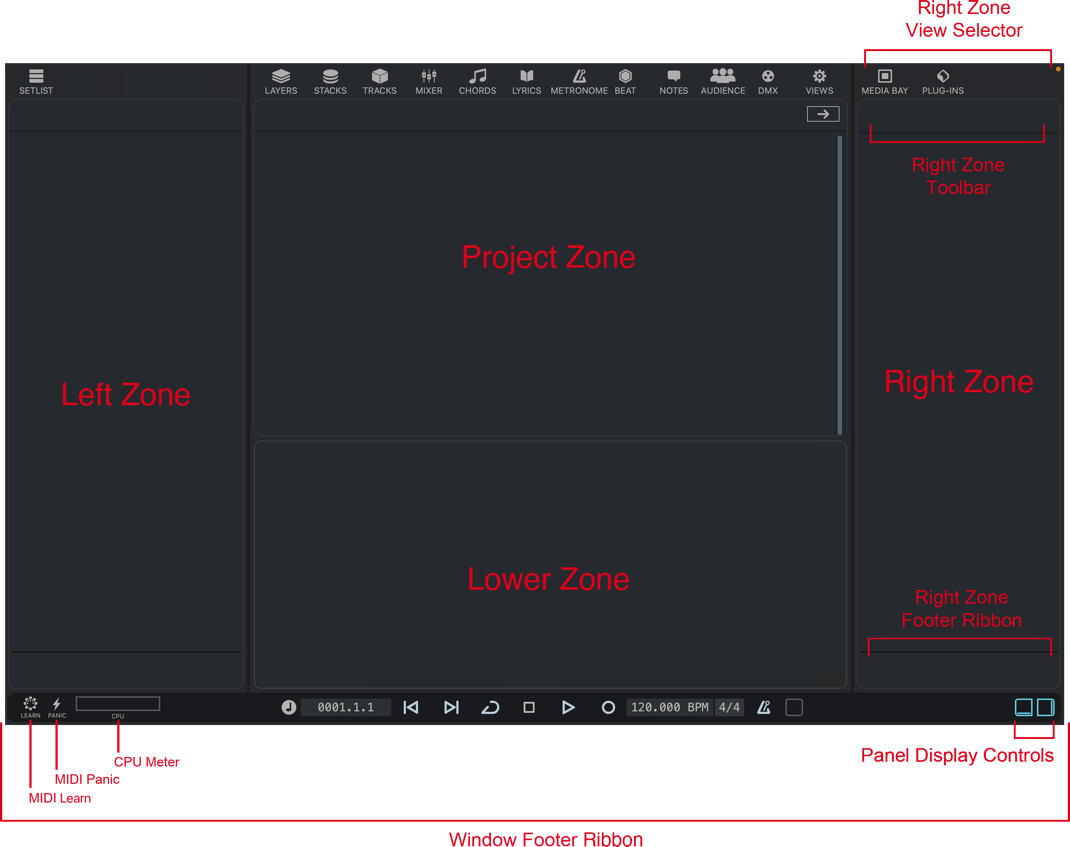
Zones 🔗
The Project Window is separated into panels called Zones. Each Zone is a self-contained area for the display and editing of data.

🔗 The Four Zones
VST Live’s Zones are Left, Project, Lower and Right.
When you create a new project, the Left and Project Zones are open; they cannot be closed.
The Left Zone is always displayed. The available Module is the Setlist.
The Project Zone is VST Live’s primary Zone; it is always displayed. Here, users can access these Views: Layers, Stacks, Mixer, Chords, Lyrics, Metronome, Tracks, Modules, Beat, Notes, Audience and DMX.
The Lower Zone is optional. Its contents are determined by the View chosen by the user for the Project Zone. Depending on situation, the available Views for the Lower Zone are:
- Multiple: The user can select any of these Views at any time.
- Single: If there is only one available View, then no Views are shown as selectable.
- None: The Lower Zone is empty.
You can resize the Lower Zone by positioning the cursor at between the top of the Lower Zone and the bottom of the Project Zone. The cursor will change to indicate vertical resizing.

The Right Zone is optional. Its Views are independent from all other Zones.
Showing/Hiding Zones 🔗
You can show/hide the Zones in the Project Window according to your needs.
Do one of the following:
- To show/hide the right Zone, clickShow/Hide Left Zoneon the Projectwindow toolbar.
- To show/hide the lower Zone, click Show/Hide Lower Zone on the Project window toolbar.
The Project and Left Zone are always displayed.
Zone Focus 🔗
One and only one Zone is always in Focus. When a Zone is in Focus, any user input or data that could be ambiguous, with respect to all open Zones, is sent to the Zone currently in Focus.
🔗 Zone Awareness
You can tell which Zone is in Focus by looking at the graphic border surrounding the Focus. If the border is turquoise (instead of grey), then the Zone in Focus.


Selecting Zone 🔗
When you begin working in a Zone, VST Live will usually put that Zone into Focus automatically.
If you need to set a Zone’s Focus manually, select an on-screen item in the Zone. You will see the Zone’s border turn green.
If the Tracks View is open in the Project Zone, you can transfer Focus to the Project Zone by selecting a Track.
Tearing-Off Project Zones 🔗
At any point, the Project Zone can be torn off into its own floating window. You can continue working in the new window, and the VST Live Project Window, independently.
New windows can be moved to additional desktops, screens, or wirelessly-connected mobile devices, depending on operating system and specific device support.
Tearing Off a Zone 🔗
Click the Tear-Off icon.
![]()
Result:The Project Zone will now float in its own window; the Project Zone in VST Live’s Project Window is unchanged.
Closing a Torn off Window 🔗
Torn-off windows are closed using the standard controls for window management in your operating system.
The floating window is closed; the Project Zone in VST Live’s Project Window is unchanged.
Returning a Torn-off Window 🔗
A window that has been torn off can be returned to the Project Window by clicking the Tear-off icon in the window you wish to return. (The icon’s color in the torn off window will have an inverted color scheme to indicate that it is a floating window.)
![]()
The contents of the floating window are moved to VST Live’s Project Zone in the Project Window. The floating window is closed.
Example 🔗
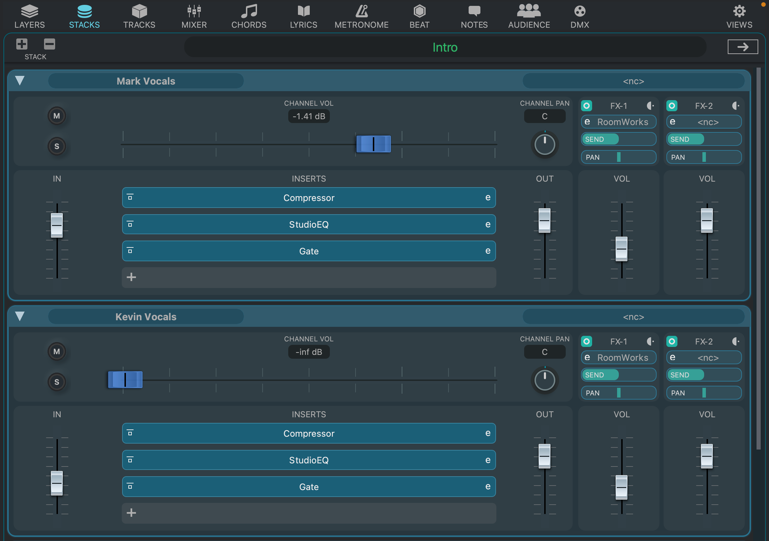
In this example, the user has set the Project Zone View to Stacks.
The user tears off the Stack View to become a floating window. Then, the user sets the Project’s View to Beat
Views 🔗
A Zone may be empty or contain a View. If multiple Views are available for a Zone, they appear as icons in a ribbon above the Zone’s toolbar. To a select a View for Zone, click the View’s associated icon.
Viewsets 🔗
Viewsets store the states of windows, Zones, and other aspects of the user interface.
🔗 Saving
To save the current interface state as a Viewset, choose View > Save Viewset.
🔗 Loading
To load a Viewset (replacing the current interface state), choose View > Load Viewset.
Command Histories 🔗
VST Live has two command buffers: Tracks History and Main History.
Tracks History 🔗
The Track history contains only operations performed on Tracks. This means any operations performed in the Project Zone with the View set to Tracks.
🔗 Availibility
There are some areas in VST Live where you can always undo or redo Tracks commands, and others that are context sensitive—they depend on what you’re currently doing.
Always Available
- Choose Song > Undo Tracks or Song > Redo Tracks
- Choose Song > Tracks History.
Available if the Project Zone’s View is set to Tracks
- Click on the Undo or Redo icons in the Project Zone Toolbar.
Available if the Project Zone’s View is set to Tracks, and the Project Zone has Focus:
- Choose Edit > Undo Tracks or Edit > Redo Tracks.
- Choose Edit > Undo Tracks or Song > Redo Tracks.
- Choose Edit > Track History.
Main History 🔗
The Main History contains all commands that are not performed on Tracks. The Main History is only available if a Track is not selected in the Tracks View of the Project Zone.
🔗 Availibility
The Main History is not always available.
Available if the Project Zone’s View is not set to Tracks (and has Focus)
- Choose Edit > Undo Tracks or Edit > Redo Tracks
- Choose Edit > History.
The Transport Panel 🔗
The Transport panel contains the primary transport functions, and other playback/recording options

Functions 🔗
The controls on the Transport are as follows:
-
Position Reference
Click to toggle between the Transport’s position reference expressed in time (e.g., minutes/seconds) and measures (e.g., bars/beats).
-
Position
The current position of the Transport Bar.
-
Rewind
Rewind the Transport Bar.
-
Fast Forward
Fast forward the transport bar.
-
Cycle
Toggles Cycle mode (on or off).
-
Stop
Stops the Transport.
-
Play
Engages the Transport.
-
Tempo
The current tempo. To change it
- Double-click inside the tempo field.
- Type the new tempo.
- Press RETURN.
If you’ve created a tempo track, the tempo event at the Song’s beginning (0 seconds) will be changed. If no tempo track exists, the Song’s global tempo will be changed.
-
Time Signature
The current time signature. To change the active Song’s current time signature:
- Double-click inside the time signature field.
- Type new (full) time signature (e.g., “3/4”).
- Press RETURN.
If you’ve created a time signature track, the time signature event at the Song’s beginning (0 seconds) will be changed. If no such track exists, the Song’s global time signature will be changed.
-
Metronome State
Toggles the Metronome on or off.
-
Pre-roll
Toggles pre-roll, a function that plays the current song for a specified period before sound is produced or recording begins.
-
Transport Focus
Give Focus to the Transport Panel, and displays the main output meter.
-
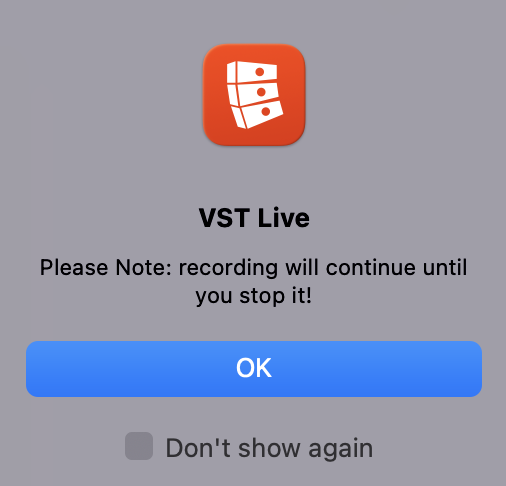
Record
Engages the Transport and records the main output channel of VST Live’s Mixer. When pressed, a dialogue box will appear to remind you that recording will continue until you manually stop it.
You can also activate this operation from the Mixer.

The record button is situated beneath the mute button.
Recordings will be saved in a Recordings folder inside your VST Live folder.
Usage 🔗
The Transport can be engaged through the panel, which is always visible in the Project window.
The In-App Help 🔗
The In-App Help offers context-sensitive information about controls and features. When the Help mode is enabled, moving the mouse over any interface element displays a short description in the Help panel.
Usage 🔗
To activate the In-App Help, click the Help icon located in the Transport Bar. When enabled, the Help panel appears and shows information about the control currently under the mouse cursor. The panel displays the title of the hovered element and a short description to assist you in understanding its function.

The In-App Help panel displays contextual information for the hovered control.
The Hub 🔗
The Hub provides one convenient place to get started with VST Live. It’s up to date with the latest information, assists you with organizing your Projects, establishes default settings, and configures your audio and MIDI setup independently by Project.
When you launch VST Live, the Hub opens automatically.
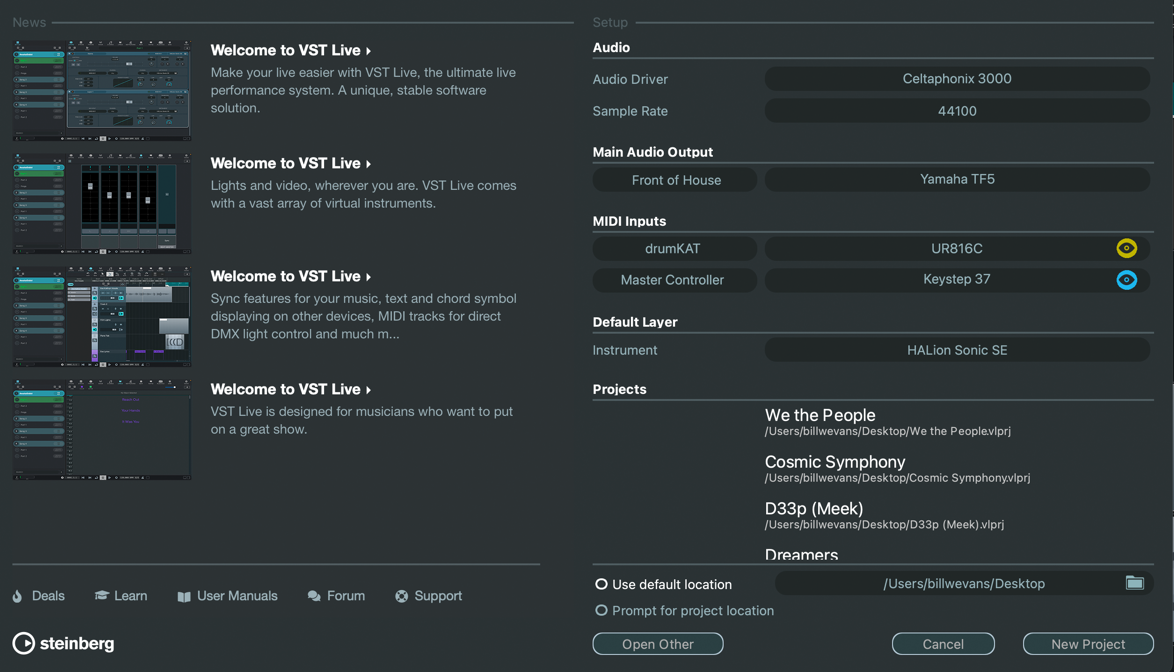
Project Settings 🔗
To use VST Live, you must set up your audio, and if required, your MIDI system. Each Project in VST Live has its own audio and MIDI configurations. The settings you provide here will be used in the next Project you create.
Once you have created your Project, additional audio and MIDI settings are accessible in the Devices menu.
Audio and MIDI preferences can be set in Preferences.
- To open the Preferences dialog, select Edit > Preferences.
Audio Setup 🔗
In the Audio section, select your Project’s audio driver and sample rate.
🔗 Audio Driver
Choose the audio driver for your sound interface here. By selecting an audio driver, you allow VST Live to communicate with the interface
On Windows® operating systems, we recommend that you access your hardware via an ASIO driver developed specifically for the hardware. If no ASIO driver is installed, contact the manufacturer of your audio hardware for information on available ASIO drivers. If no specific ASIO driver is available, you can use the Generic Low Latency ASIO driver.
🔗 Sample Rate
Once you have chosen an audio driver, you may choose the sampling rate. The available sample rates are those which are supported by your audio driver.
Some audio interfaces provide additional configuration options, some of which may be necessary for successful operation. These settings are normally gathered on a control panel that can be opened from within VST Live or separately, when VST Live is not running. For details, refer to the audio hardware documentation.
Main Audio Output 🔗
Once you have selected your driver and sample rate, you can add a stereo output from your audio interface to your Project. You can think of this as your primary audio output.
- To choose an output, click inside the right-side oval in the Main Audio Output section. A pop-up menu will display a list of available outputs on the audio interface that you chose the driver for. An additional option is labelled “nc” (non-connected); choose this option to deactivate the output
- The default name for this output is “Main”. To rename it, click on that word
Additional audio input, output and buss configurations can be managed by selecting Devices > Connections.
MIDI Inputs 🔗
When creating a Project, in addition to choosing an audio output, you also choose two MIDI inputs. By default, both inputs are set to the first two available MIDI Inputs (if applicable).
🔗 Assigning
To choose your inputs, click inside the corresponding right-side oval. A pop-up menu will display the available inputs
Two types of MIDI Inputs are always available to assign
- Virtual MIDI: A virtual MIDI bus can be used to create MIDI routings within VST Live.
- Non-Connected (“nc”): The Midi input is inactive.
If you have physical MIDI interfaces connected to your computer, they are also available for selection
🔗 Naming
The default names for these inputs are “MIDI In 1” and “MIDI in 2”.
- To change it, click on the existing name.
🔗 Coloring
Each MIDI input in VST Live has a color assigned to it. The default color is blue.
- To assign a different color, click on the Eye icon.
News and Tutorials Section 🔗
The News and Tutorials section displays Steinberg news, tutorial videos as well as links to the user forum, downloads, and the Help Center.
Ensure that you have an active Internet connection to access this material.
Recent Projects 🔗
Your most recent Projects will be listed under Projects, with the newest Project at the top. Click a Project to load it
Local File Storage 🔗
You can set a default location where Projects are saved by clicking the Folder icon. If this option is checked when you create a new Project, it will be saved in that directory. Alternately, you can select “Prompt for location”; the next Project you create will be saved there
Existing Projects 🔗
The Open Other button allows you to open Projects stored on your computer. This is identical to using the Open command in the File menu.
Exiting 🔗
The Quit button will exit VST Live. It is identical to the Quit command in the File menu.
Creating the Project 🔗
The Quit button will exit VST Live. It is identical to the Quit command in the File menu.
VST Live Projects 🔗
The Project window provides an overview of your set. From here you can navigate your Setlist, set up your digital gear, prepare your show, and then perform it.
Project and File Management 🔗
The Project window provides an overview of your set. From here you can navigate your Setlist, set up your digital gear, prepare your show, and then perform it.
VST Live Projects and their files can be managed using the File menu.
VST Live Projects 🔗
Project files contain all the information that you create and edit, including all MIDI data. They do not contain audio or video files.
- To open a Project, select File > Open.
- To create a new Project, select File > New Project.
- To archive the current Project, select File > Archive Project. Your project, and all of its assets, will be copied to a new folder.
Media Projects 🔗
Media Projects are a software-independent format for storing a song and its assets. It is portable and self-contained, enclosing all of a song’s data. Within the top-level folder, a small file contains the song information. Sub-folders contain each type of data used by the song. These data types include:
- Audio
- MIDI
- Video
- DMX
- Tempo
- Time Signature
The goal of the Media Project format is to maximize the granularity of data, so that software applications can use as much or as little of each type of data that they support. For this reason, every aspect of a Media Project file is an individual file—even tempo and time signature changes. Media Projects are therefore a flexible, lightweight format for interchanging song data between software applications.
VST Live can export and import Media Projects to exchange songs with Cubase or Nuendo, with detailed preservation of data between them.
Importing from a Media Project
To export the active song as a Media Project from VST Live select File > Export Media Project. All of the data from your (open) VST Live Project will be copied to the Media Project folder.
Exporting to a Media Project
To import a Media Project into VST Live, select File > Import Media Project.
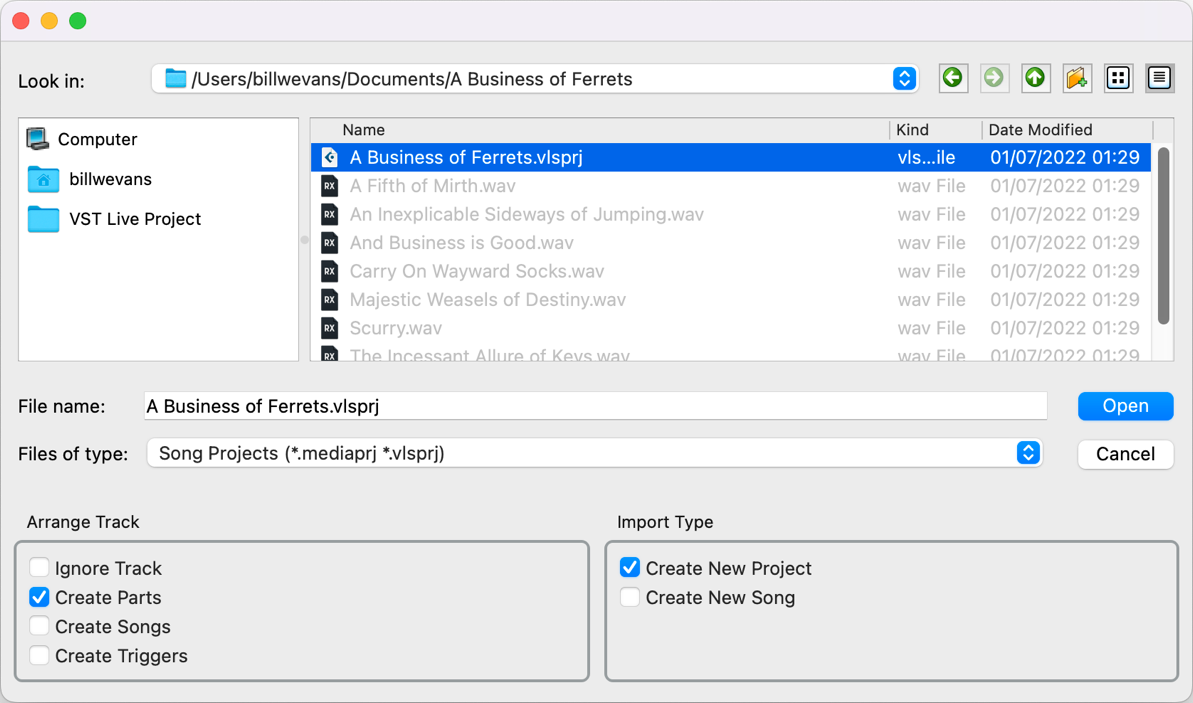
Arrange Track
Cubase or Nuendo’s Arrange Track can be used flexibly with VST Live.
Media Projects are a software-independent format for storing a song and its assets. It is portable and self-contained, enclosing all of a song’s data. Within the top-level folder, a small file contains the song information. Sub-folders contain each type of data used by the song. These data types include:
- When importing a project that has an Arrange track, the sections of this track can be used to create Parts, Songs and Triggers in VST Live.
- When exporting, Parts, Songs or Triggers can be used to create an Arrange track in the exported project.
Import Type
When importing a Media project, you can choose to create a new Song within your current Project, or within a new Project.
Importing Individual Files 🔗
You also can import standardized (e.g., WAV, MP4, MIDI) media files into your open Project.
- To import a MIDI file, select File > Import MIDI File. The MIDI file will then be embedded within your VST Live Project file
- To import an audio file, select File > Import Audio File. This procedure will not embed the audio file within the Project file—it will only store a reference to it
Importing Video 🔗
This command will create a new video track in the current Song, containing the video you import.
Extracting Audio from Video 🔗
You can extract just the audio from a video on your mass storage device with this option.

Preloading Data into Your Project 🔗
Preloading data, such as programs/patches for the HALion Sonic instrument, ensures that sounds are instantly and available when you switch Parts.

To preload, choose File > Preload…
Viewing Your Project Interface in High Resolution 🔗
If your computing device’s display supports high resolution (e.g., HiDPI, Retina®) enabling this option will provide the clearest image.
Recent Projects 🔗
VST Live will store the name and location of the ten most recent Projects that you load into VST Live.
- To view and load a recent Project, select File > Recent Projects and the Project you wish to load.
If the location of a VST Live Project file has changed since it was last loaded, the Recent Projects function cannot load it. Instead, open the Project by selecting File > Open
Sounds 🔗
Sounds for VST Live are defined as a Preset (including its plugin). They can be accessed using different methods in VST Live, including dragging them from the Media Bay onto Layers.
Save 🔗
To save a Sound to local file storage, choose Sound > Save Sound.
Load 🔗
To load a Sound from local file storage, choose Sound > Load Sound.
Copy 🔗
To copy the selected Sound to the Clipboard, choose Sound > Copy Sound.
Paste 🔗
To paste a Sound from the Clipboard, choose Sound > Paste Sound.
Mobile Applications 🔗
The desktop version of VST Live has a mobile device companion application. It extends the desktop version to provide functionality directly for your performance.