Setlist
A Setlist is the blueprint for your show. For each Song, you can specify its Parts and their respective settings for each band member, assembling them into a powerful tool to follow and guide your performance. The elements available include tools for processing live audio, smoothing transitions between virtual instruments, and synchronizing DMX lighting control.
When you create a new Project, a Setlist is created automatically.
Setlist Features 🔗
Setlists have features for managing their Songs, and be modified in real-time during a performance.
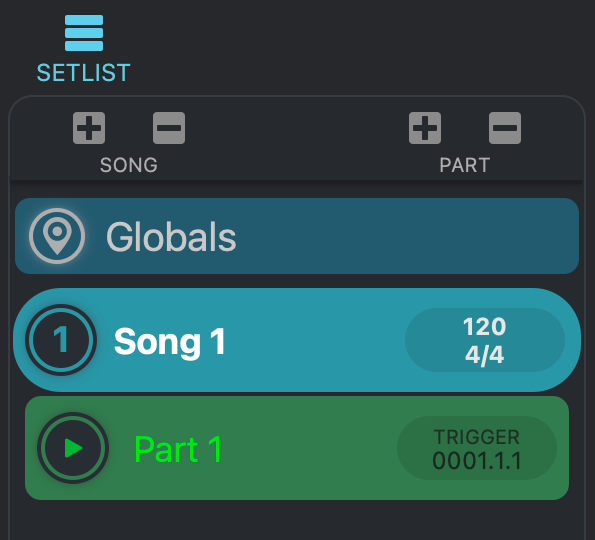
Setlist Panel 🔗
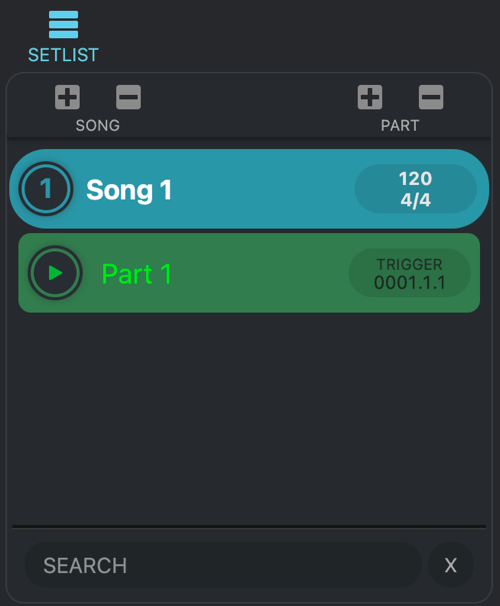
You access your set list in the left panel of the main window.
The Setlist is always visible.
Visibility 🔗
The Setlist panels displays Songs, each of the Song’s Parts, and (if present) the Global Part.
- A Song’s Parts can be viewed or hidden by clicking the Song’s number
- The Global Part is always visible, at the top the of the Setlist.
- The Setlist panel is always visible.
Hierarchy 🔗
The Setlist is at the top of a VST Live Project’s hierarchy of elements:
- Setlists, Songs and Parts all represent sequences to produce a narrative of music and sound.
- Layers and Stacks are the elements that generate that audio.
- Modules provide expansion abilities to VST Live.

Setlist Editor 🔗
A Project may contain multiple Setlists. This functionality may be useful, for example, if you have different versions of your show based on running time. You can create and manage multiple Setlists in the Setlist Editor.
Accessing the Setlist Editor
The Setlist window is a tear-off floating window.
Choose Song > Setlists…

Click the Setlist View icon in the Setlist Zone’s View ribbon.
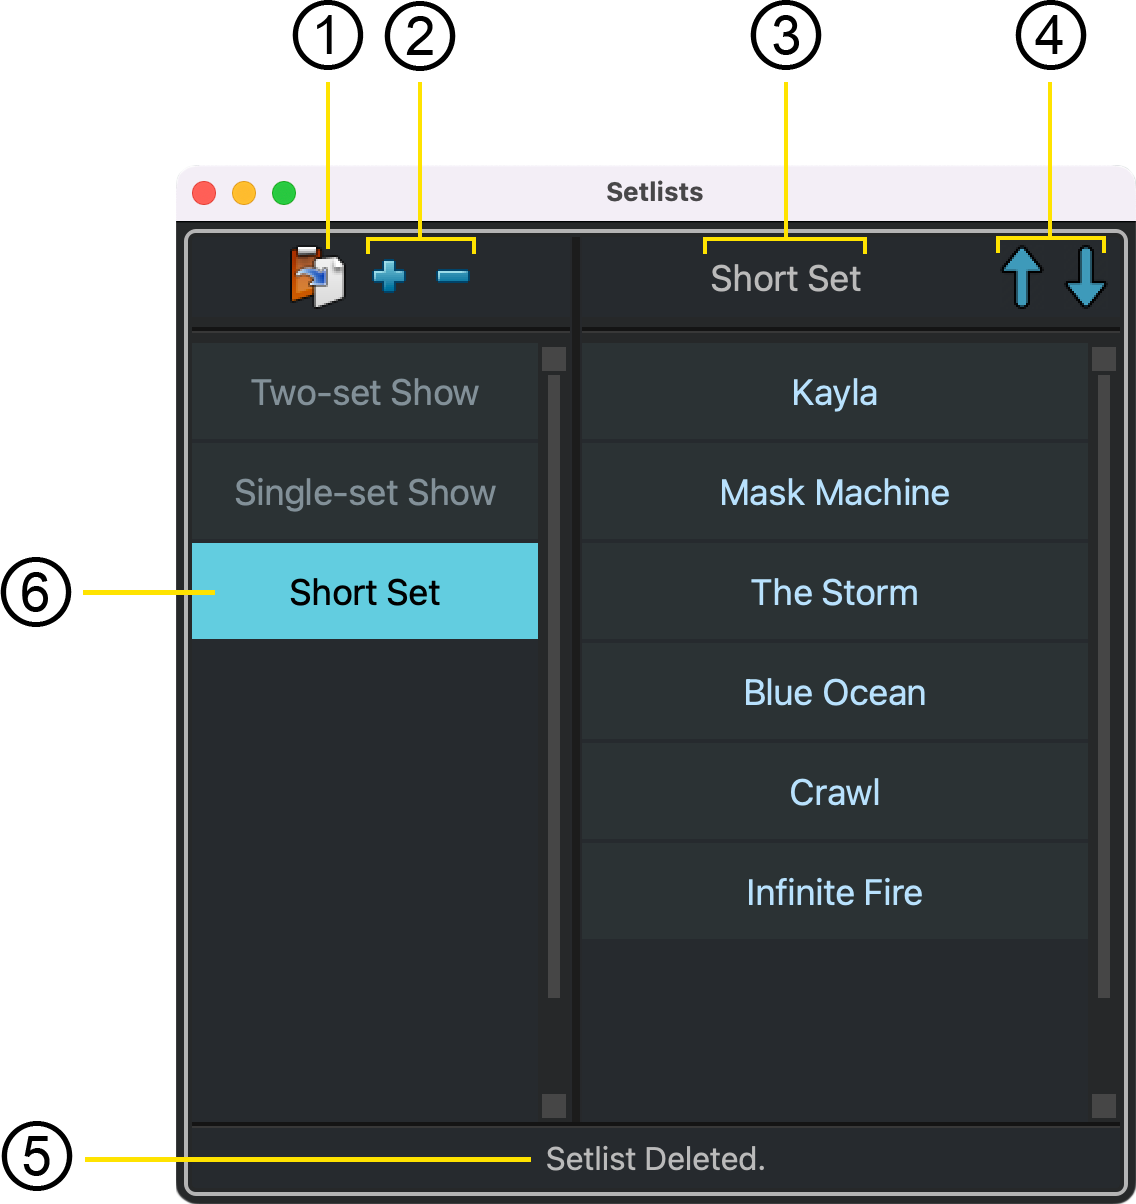
- Recall Setlist
Clicking this icon will load the selected Setlist into your Project.
- Assemble the desired Setlist in the Setlist Zone.
- Click the Plus icon in the Setlist Editor floating window.
- Add and Remove Setlists
Use these icons to add a new setlist, or delete the selected Setlist.
Adding SetlistsYou can add a Setlist to your Project; it will be saved with your VST Live Project, and included in exported Media Projects.
- Assemble your desired Setlist in the Setlist Zone of the Project Window.
- Open the Setlist editor by clicking the Setlist View icon in the Setlist Zone’s View ribbon
- Click the Plus icon in the Setlist Editor.
Removing SetlistsThe Setlist has been added to the Setlist editor.
Setlists can be removed from the Setlist Editor. Doing this will delete them from your Project.
- Open the Setlist Editor.
- Click on the Setlist you wish to remove.
- Click the minus icon.
The Setlist has been removed from your Project.
- Selected Setlist Name
This is the name of the selected Setlist.
- Song Ordering Buttons
Use these arrows to reorder the songs of the selected Setlist.
- To change the order of Songs, select the desired song, and use the arrow icons to move the Song up or down the Setlist.
When you have set your desired order of Songs, you can load the Setlist into your Project using the Recall Setlist icon.
You can also drag Songs to reorder them.
- Select the Song you wish to reorder in the Setlist Editor by clicking it.
- Drag the Song to the order you wish in the Setlist Editor.
Click the up/down buttons in the Setlist Editor.
The select Song is now in your selected place in the selected Setlist.
- Message Bar
The area is used by VST Live to provide information about the results of operations you perform in the Setlist editor.
- Setlist Selector
Choose the Setlist you wish to edit by clicking its name in the left column on the Setlist Editor. Once selected, you can use the tools of the Setlist Editor to edit, recall or remove Setlists. You can also rename Setlists.
- Double-click on the Setlist’s name in the left column.
- Type the new name for the Setlist.
- Press RETURN.
The selected Setlist has been renamed.
Song Features 🔗
All VST Live Projects contain at least one Song. When you a create a Project, a Song is automatically created.
Song Operations 🔗
VST Live provides comprehensive tools to manage and organize the Songs within the Setlist Zone. You can perform the operations listed below.
Many operations that can be performed in the Setlist panel are also accessible in the Song menu. This menu has additional operations are also accessible in this menu.
Add a Song to the Setlist

Click the Plus icon.
Choose Song > New Song.
New Songs are always added to the end of the active Setlist.
Remove a Song from the Setlist

Click the Minus icon.
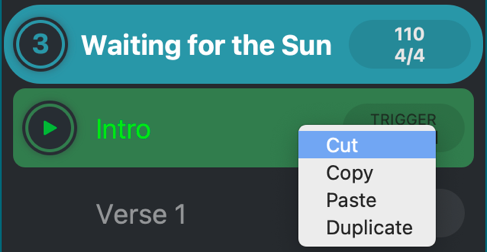
Cut a Song from the Setlist to the Clipboard
- Select the Song you want to cut by clicking it.
- Choose Song > Cut Song.
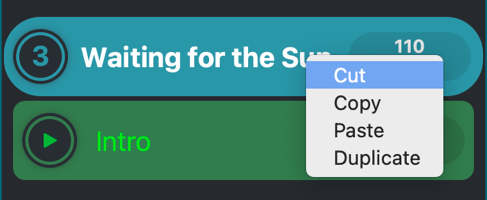
- Right-click on the Song name to access its contextual menu.
- Choose Cut.
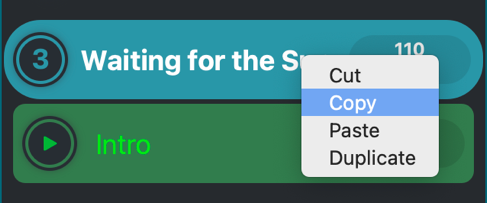
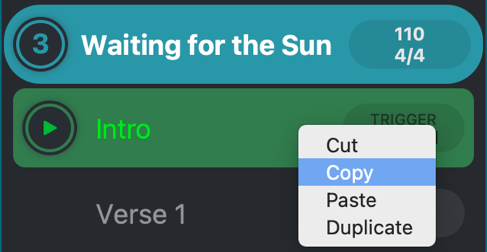
Copy a Song to the Clipboard
- Select the Song you want to copy by clicking it.
- Choose Song > Copy Song.
- Right-click on the Song name to access its contextual menu.
- Choose Copy.
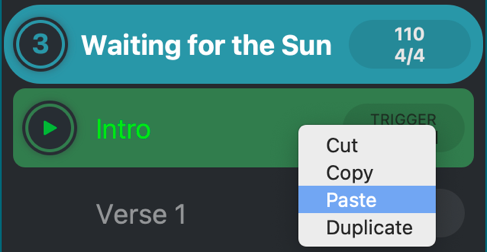
Paste a Song from the Clipboard into the Setlist
Choose Song > Paste Song.
- Right-click on the Song name to access its contextual menu.
- Choose Paste.
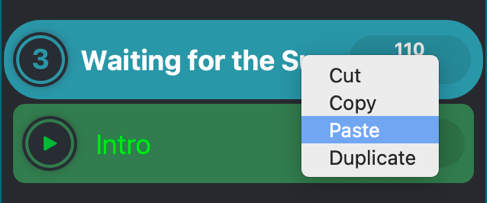
Songs are pasted at the end of the Setlist.
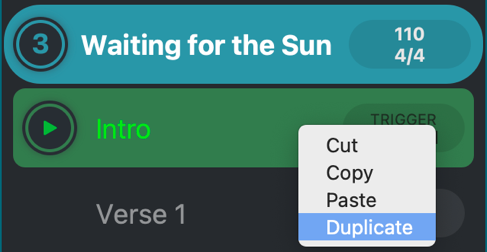
Duplicate a Song
- Select the Song you want to duplicate by clicking it.
- Choose Song > Duplicate Song.
- Right-click on the Song name to access its contextual menu.
- Choose Duplicate.
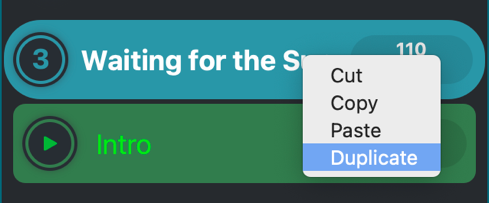
Duplicated Songs appear directly after the currently selected Song in the Setlist.
Reorder Songs
- Select the Song you want to copy by clicking and holding.
- While holding, drag the Song to the new location in the Setlist.
Load/Save Songs 🔗
Individual Songs can be loaded and saved to the Setlist from the Song menu.
Load
You can load a song saved from another Setlist, or previously from the active Setlist.
- Choose the Song in the Setlist you wish the loaded Song to precede.
- Choose Song > Load Song.
Save
You can save a song to be loaded into other Setlists, or loaded at later time into the active Setlist.
- To save a song, choose Song > Save.
Save Default Song
You can choose which Song is automatically loaded for whenever a new Song is created, either by you, or by VST Live (e.g., when you create a Setlist).
- To save a song as a default, choose Song > Save Default Song.
Song Projects 🔗
A Song Project contains all of the Tracks associated with a single Song, with each type of asset (e.g. audio, MIDI, DMX) saved in their respective folders. This allows you to import a Song into multiple VST Live Projects.
Song Projects differ from Media Projects in that the latter also contains Project structures such as Layers and Stacks.
Import a Song Project
Importing a Song Project will replace all the tracks of the currently selected Song in the Setlist.
- Select the Song whose tracks you wish to replace.
- Choose Song > Import Song Project.
All of the currently-selected Song’s tracks will be removed.
Export Song Project
- Click the Song you wish to export in the Setlist to select it.
- Choose Song > Export Song Project.
Song Properties 🔗
The properties of a Song that are relevant to a Setlist can be adjusted from the Setlist Zone.
Rename a Song
- Double click on the Song’s name in the Setlist.
- The cursor will turn from an arrow to a caret.
- You can now type, changing the Song’s name.
- Press Return.
View and Set Tempos
By default, songs have one set tempo of 120 beats per minute. It is possible to define multiple tempos for song, with tempo changes at specific times, by creating a Tempo Track.
A Song’s current tempo is displayed in the shaded oval on the right side of a Song’s Setlist entry.
To change the current tempo of a song:
- Double click on the Song’s tempo inside the shaded oval.
- The cursor will turn from an arrow to a caret.
- Type the new tempo.
- Press Return.
If the song has a set tempo, the new tempo will be set for the whole song. For a song with a Tempo Track, the new tempo you have entered will change the tempo for active Tempo Map event.
View and Set Time Signatures
By default, all Songs have a time signature of 4/4 (four beats per bar). As with tempo, It is possible to define multiple time signatures for song, with changes at specific times, by creating a Time Signature Track.
A Song’s current time signature is displayed in the shaded oval on the right side of a Song’s Setlist entry.
To change the current time signature of a song:
- Double click on the Song’s tempo inside the Transport Ribbon.
- The cursor will turn from an arrow to a caret.
- Type the new time signature.
- Press Return.
If the Song has a set time signature, the new time signature will be set for the whole Song. For a Song with a Time Signature track, the new signature you have entered will change the time signature for currently-active Time Signature Map event.
Song Part Triggers 🔗
Song Part Triggers determine how and when the Parts of a Song are activated while a Song is playing. The Part Trigger window provides a list of all the scheduled Part Triggers for a Song, and allows Triggers to be added and removed.
- Choose Song > Song Part Triggers…
Song End Action 🔗
You can create a special trigger that fires at the end of a song.
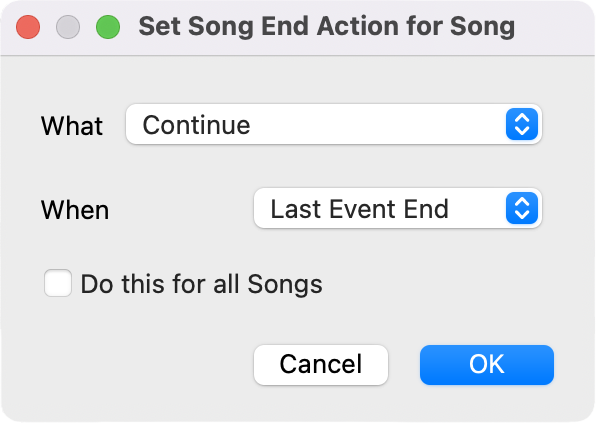
What is Triggered 🔗
The What menu determines the action that is taken.
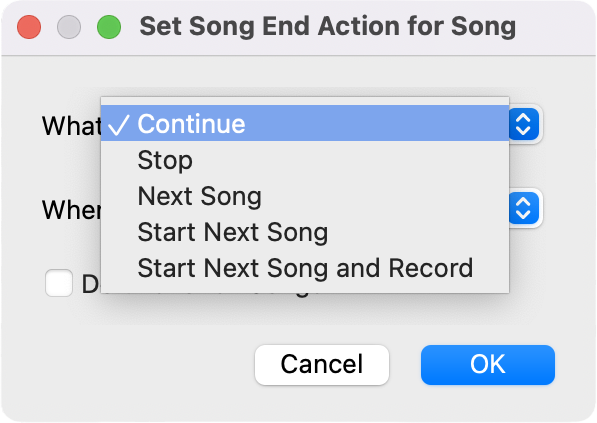
- Continue: Continue the current Setlist.
- Stop: Stop the Setlist and do not play more Songs.
- Start Next Song: Begin the next song in the Setlist.
- Start Next Song and Record: Begin the next song in the Setlist, and record it.
When the Trigger Fires 🔗
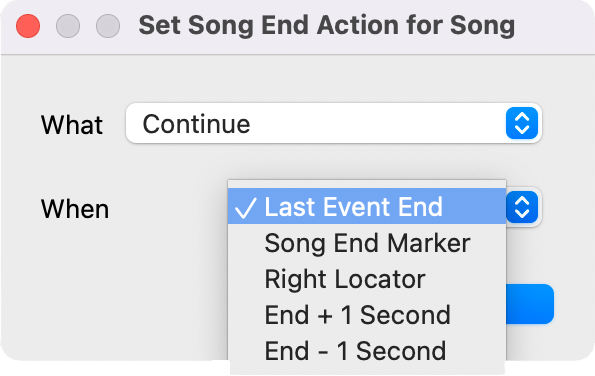
The When menu defines precisely when, at the of Song, the trigger fires.
- Last Event End: After the last event in song (e.g., a MIDI note) ends.
- Song End Marker: When the Song End Marker is reached.
- End + 1 Second: One second after the song ends.
- End – 1 Second: One second before the song ends.
Do This for All Songs 🔗
This option applies your selections in the dialogue box to (the end of) all Songs.
Part Features 🔗
Each Song in VST Live is composed of one or more sequential Song Parts. Traditionally, these Parts represent Song structure such as “Verse”, “Chorus” and “Bridge”. And while you can use these delineations in VST Live, you’re also free to define your Song’s Parts in any way you wish.
Just like a Song is automatically created when you begin a Project, a Part is automatically created when a Song is created.
One way to think of Song Parts is to consider not only your Song’s melodic structure, but also the Parts that comprise your performance of it. Another way is to think of a Song as a Setlist of Parts.
Each Song Part is unique, and only one Song Part is active at any time. In addition to Song Parts, you can create Global Part, which are always active within the Setlist they’re defined in.
Part Operations 🔗
Many of the operations for Parts are similar to those for Songs. Parts contain different information than Songs, though, so some operations are unique to each.
All operations that can be performed in the Setlist panel are also accessible in the Song menu, and in the (right/control-click) contextual menu. This menu has additional operations which are also accessible in this menu.
Add a Part to a Song

Click the Plus icon.
Choose Part > New Part.
New Parts are always added to the end of the selected Song’s Parts list.
Remove a Part from a Song

Click the minus Stack.
Cut a Part from a Song to the Clipboard
- Select the Part you want to cut by clicking it.
- Choose Part > Cut Part.
- Right-click on the desired Part’s name in the Setlist to access its contextual menu.
- Choose Cut.
Copy a Part to the Clipboard
- Select the Part you want to copy by clicking it.
- Choose Part > Copy Part.
- Right-click on the desired Part’s name in the Setlist to access its contextual menu.
- Choose Copy.
Paste a Part from the Clipboard into the Setlist
- Click the Song’s name in the Setlist in which you wish to paste the Part.
- Choose Part > Paste Part.
- Right-click on the Song name to access its contextual menu.
- Choose Paste.
A pasted Part will always appear at the end of a Song.
Duplicate a Part
- Select the Part you want to copy by clicking it.
- Choose Part > Duplicate Part.
- Right-click on the Part name to access its contextual menu.
- Choose Duplicate.
Duplicated Parts will always appear directly after the currently selected Song in the Setlist.
Reorder Parts
- Select the Part you want to reorder by clicking and holding.
- While holding, drag the Part to the new location in the Song.
Rename a Part
- Double click on the Part’s name in the Setlist.
- The cursor will turn from an arrow to a caret.
- You can now type, changing the Part’s name.
- Press Return.
Load/Save Parts 🔗
Individual Parts can be loaded and saved to a Song from the Part menu.
Load/Save Parts
- Choose the Song in you wish to load a Part.
- Choose Part > Load Part.
The loaded Part will appear after the selected Part.
Save a Part
- Select the Part you wish to save.
- Choose Part > Save Part.
Save the Default Part
You can choose a specific Part to load by default whenever a new Part is created—either by you, or by VST Live. To save the current Part as the default Part:
- Select the Part you wish to be the default Part when a Song is created.
- Choose Part > Save Default Part.
Part Activation 🔗
VST Live provides a wide choice of mechanisms to determine when a Part plays during a Song. They are referred to as Triggers, and can be divided into Scheduled and Real-time.
Scheduled
A Part can be scheduled to occur at specific time during a Song’s playback by several methods.
Setlist Trigger
Time-based scheduling can be done using Triggers.
- Set the Transport to the time you wish the Part to trigger.
- Click in the trigger oval on the right side of the Part listing.
The first Part of a Song must begin at 00:00; it cannot be changed.
Real-time
There are several procedures you can use to activate a Part in real-time. When you do this, the currently activate Part is deactivated, and the new one is activated.
ActionParts can be activated with MIDI commands using VST Live’s Actions.
Setlist IconIf the Setlist is open, and the Part listing viewable, click the Part’s Play icon to activate it.
Menu Item- To move to the previous Part, choose Part > Previous Part.
- To move to the next Part, choose Part > Next Part.
- To move to the previous Part, press the Up-Arrow key on your keyboard.
- To move to the next Part, press the Down-Arrow key on your keyboard.
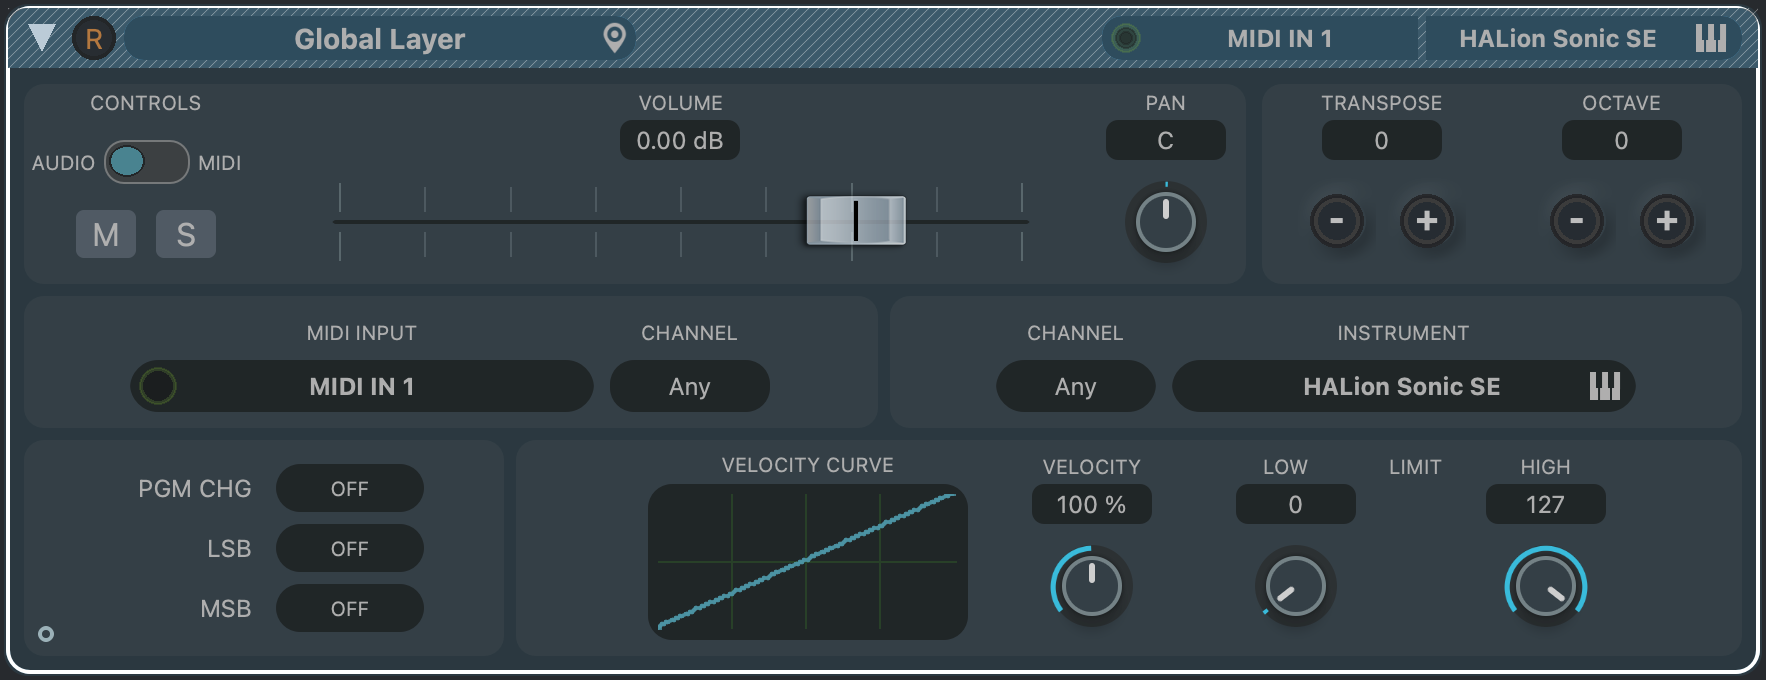
Global Part 🔗
Global Parts belong to Setlists instead of Songs. They are active and available at all times while their parent Setlist is loaded.
Creating a Global Part
A Global Part is created using the Parts menu. Once one is created, two new interface elements will appear: above the Setlist, and in the Toolbar for Layers and Stacks.
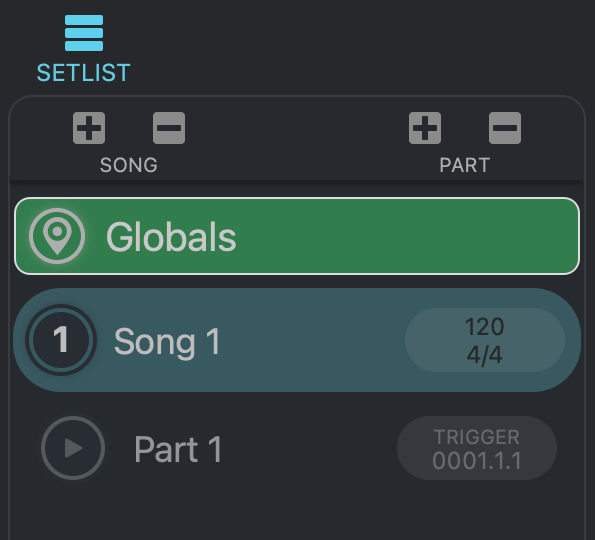
Viewing the Global Part
Once a Global Part has been created, a header button will appear at the top of the Setlist.
-
Click the Globals header; the header will illuminate.
-
Click the associated icon button in the Main Toolbar (Layer, Stacks and Modules) to see all of the associated Global elements.
Viewing a Global Part While Editing Song Parts
While editing a Song Part (Layer, Stack or Module), if a Global Part exists, a Global icon button will appear in Project Zone’s toolbar.

Click this icon button to reveal all the Global icons of the element being edited; the Global elements will appear above the Song elements.
The Global elements will be visually distinguished with a diagonally-patterned background across its top.